Openers · Haldimand County
Photo-Eye Sensor Alignment or Replacement
The small light on one of the sensors near the floor has gone dark, or it flickers when someone walks past the track. The other one glows steadily.
Photo-Eye Sensor Alignment or Replacement
In plain words
By the end of the visit you have a door that closes from every control and reverses the instant the beam is broken, a sensor pair mounted level at the right height with steady indicator lights, wiring that is secured and out of harm's way, and a written note of what was found and what was changed. The technician walks you through the two tests you can repeat monthly, points out which light is which, and leaves the opener's diagnostic chart where you can find it. It is a small job that puts a large piece of your door's protection back in service.
How the visit goesYou press the remote, the door drops a few centimetres, then climbs straight back to the top while the opener light blinks. Nothing is under the door. It has done this every evening this week.
Haldimand County
How the visit goes
Reading the two small lights
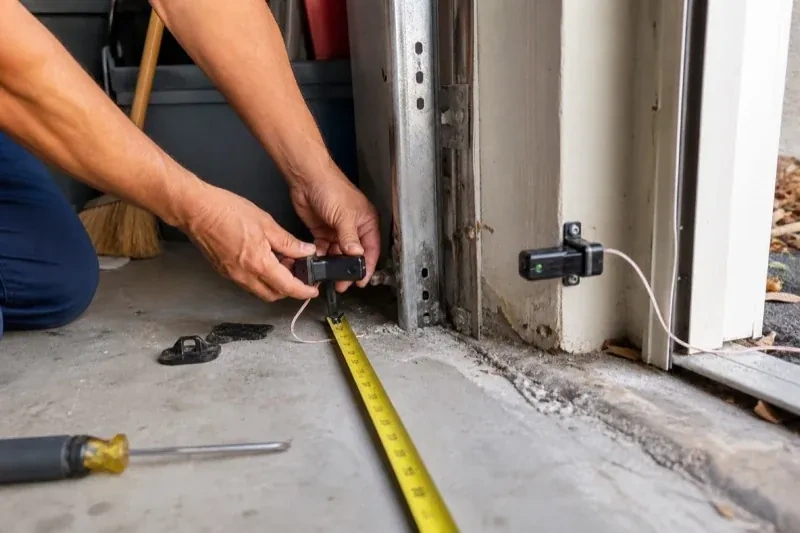
Most sensor pairs carry an indicator on each side, though some older models light only the receiver, so the technician checks that model's own chart first. On most openers the sending eye shows one colour and the receiving eye another, and both should glow without a flicker. If the sending light is steady and the receiving light is dark or blinking, the beam is not landing where it should: misalignment, an obstruction or a dirty lens. If both are dark, the pair has no power, pointing up the wire to a cut, a loose terminal or reversed connections. The technician also nudges each bracket gently while watching the light; a flicker on touch means a loose mount.
Bringing the pair back to the doorway
Sometimes the sensors exist but have been defeated: taped face to face next to the head unit so the circuit is always satisfied and the door closes on anything. The technician separates the pair, checks that both still work, and mounts them where they belong on each side of the opening, low to the floor and facing each other. New wire is run down each side, brackets are fitted, and the alignment is set. The opener is then made to prove itself with the beam test, and the household is shown why the pair matters and how to keep it working, so the shortcut is never tempting again.
Keeping the brackets out of harm's way
Most repeat sensor calls come from the same few habits, and they are easy to change. Keep recycling bins, bicycles, boots and the snow shovel away from the bottom of the door track on both sides. Park with a little room to spare so a bumper never meets a bracket. When you sweep or blow snow out of the garage, aim away from the sensors rather than at them. If shelving or a workbench goes in along that wall, leave the strip near the floor free. The brackets are sturdy, but they hold a precise line, and a nudge that would not bother anything else is enough to lose the beam.
Photo-Eye Sensor Alignment or Replacement
In the van
- Wing nuts and carriage bolts
- Two-conductor low-voltage wire
- Track-mount sensor brackets
- Wire connectors
- Multimeter
What affects the quote
Same fees day, night or weekend
1Winter conditions on the day
Snow and ice packed against the brackets, a frozen bottom seal or a frozen floor where anchors must go all add a little clearing and care before the sensor work itself can start.
2Bracket condition
A bracket that can be straightened costs little time. One that is cracked, rusted through or missing is replaced, and a change from track clips to wall or floor brackets adds anchors and mounting work.
3Access to the doorway and the head unit
A clear strip along the floor and a reachable head unit make for a direct job. Shelving, vehicles or stored goods that must be moved to reach the sensors, wire or terminals add time.
Photo-Eye Sensor Alignment or Replacement: questions
Do both sensors get replaced together?
Yes. The sending and receiving sensors are made and sold as a matched pair for a given opener family, and the head unit expects both to be from the same generation. Fitting a pair also means both lenses, both indicators and both mounting points are fresh at the same time, so the alignment holds and the next check is simpler. A single sensor from an unrelated kit is where mystery faults come from.
How long does a sensor visit take?
Alignment, cleaning and a bracket adjustment are done inside an hour on most doors, including the two tests at the end. Replacing the pair adds a little for wiring and setup. Re-running the wire all the way from the motor to both sensors is the part that stretches a visit, especially where the wire is behind a finished ceiling or the garage is full. Having the floor by the door clear before arrival helps.
How do I test the sensors each month?
Start the door closing and, while it is moving, swing a broom handle through the beam low across the opening; the door should halt and travel back up. Next, put a 2x4 flat beneath the door's centre and run the door onto it; it should back off as soon as it touches. If either test fails, close the door first if you can, use it by hand with the manual release, and book a visit; do not release it if it feels heavy.
Openers & Access
- Chain-Drive Opener RepairThe door closes, touches the floor, then climbs straight back up as if it hit something.
- Belt-Drive Opener RepairIt is minus twenty in the detached garage and the door climbs in jerks, the belt stiff as a board.
- Garage Door Opener ReplacementThe bedroom above the garage shakes every morning at six when the chain drive fires up.
Photo-Eye Sensor Alignment or Replacement near you
For homes and businesses in Haldimand County we handle the full run of garage door work: broken springs and cables, doors that have left the track, openers and remotes that stopped answering, worn rollers and seals, tune-ups, and new doors chosen and installed to suit the building.